Consignor School
Everything you need to know to enter, tag, and prepare your items for the Kelly's Kids Consignment Sale.
Clothing Preparation Checklist
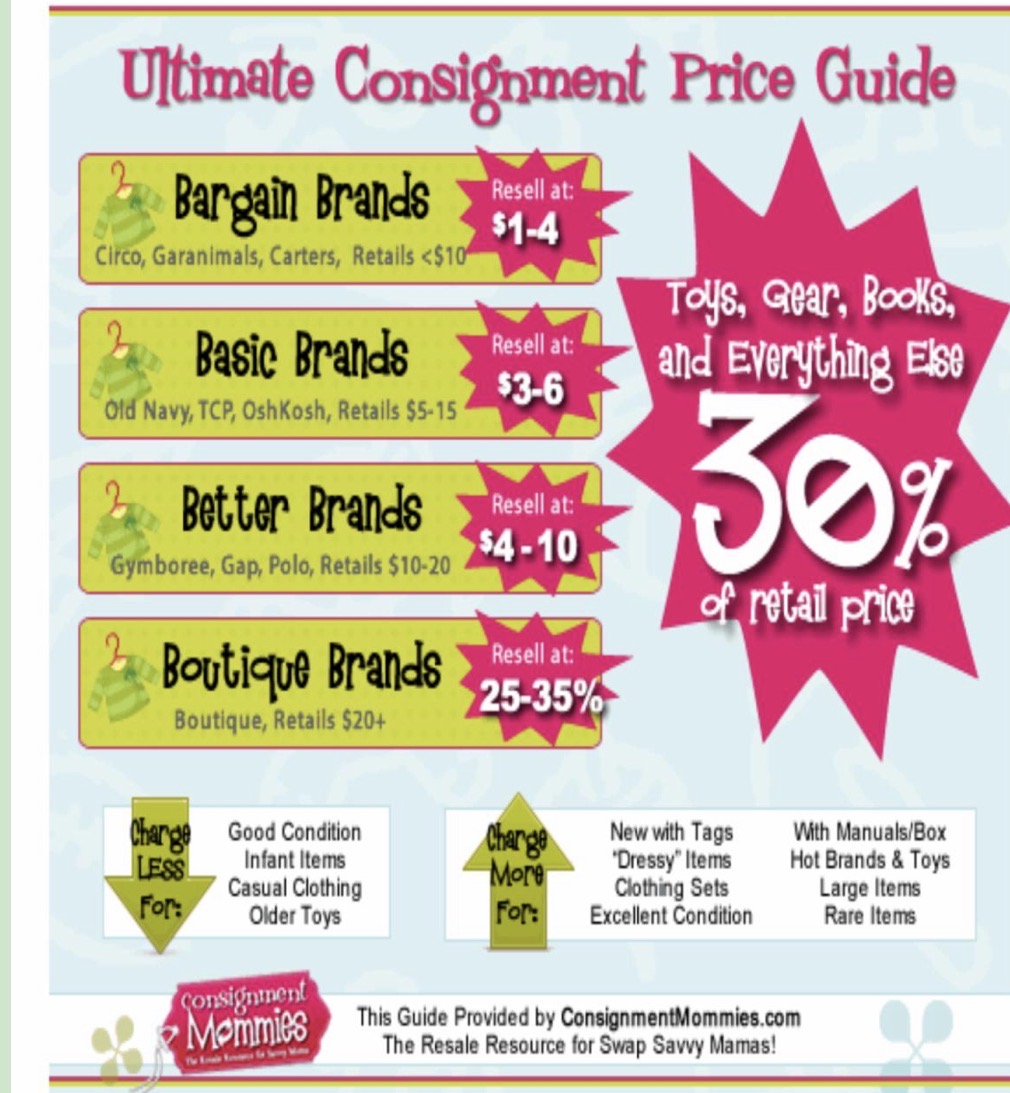
Pricing Reminder
All items must be priced at $2.00 or above in $0.50 increments. If an item is not worth $2.00 on its own, group it with another item (e.g., pair of pants) to reach the minimum. Price at 1/4 to 1/2 of original retail. Ask yourself: "What would I be willing to pay for this?"
Step-by-Step Instructions
Sort Your Items & Gather Supplies
Before you start entering items, arrange your clothing in order by gender and size. Getting organized first will make the tagging process much faster and more efficient.
Gather These Supplies Before You Start
Register & Log In
Register as a consignor if you haven't already. A $10.00 non-refundable consignor fee will be deducted from your earnings check — no money needed upfront.
Then log in to your Consignor Account using your consignor number and password.
Click "Work With My Consigned Items"
Once logged in, click "Work With My Consigned Items" to open the item entry screen.
Enter Your Items
For each item, fill in the following fields:
Select the appropriate category for your item (clothing, toys, gear, etc.).
Select the correct size.
Be descriptive! A good description helps your item sell. Include brand name, color, style, and condition.
Must be in $0.50 increments starting at $2.00 (e.g., $2.00, $2.50, $3.00). As a general rule, price at 1/4 to 1/2 of the original retail price.
- Like new & name-brand? Price it higher.
- Well loved & not name-brand? Price on the lower end.
- Want everything to sell? Price to move — ask yourself what you'd pay for it.
Check the discount box if you want your item sold at half price on Saturday (the Half Price Day). If unchecked, your item will not be discounted and may miss its chance to sell.
Check the donate box if you want unsold items donated to charity. Note: All items must be picked up by 3:00 PM on the last day — anything not picked up will be donated regardless of this setting.
Click "Add Item" or press Enter
The system adds the item to the bottom of the screen and saves it automatically. If you leave the tab or get timed out, don't worry — your items are still saved in the database and can be found in the Manage Inventory screen. The system times out after 15–20 minutes of inactivity, so try to sort your items before you start.
Print Your Tags
When ready, select one of the "Print Tags" options from your Consignor Account.
Attach Tags to Your Items
Attach your printed tags securely to each item.
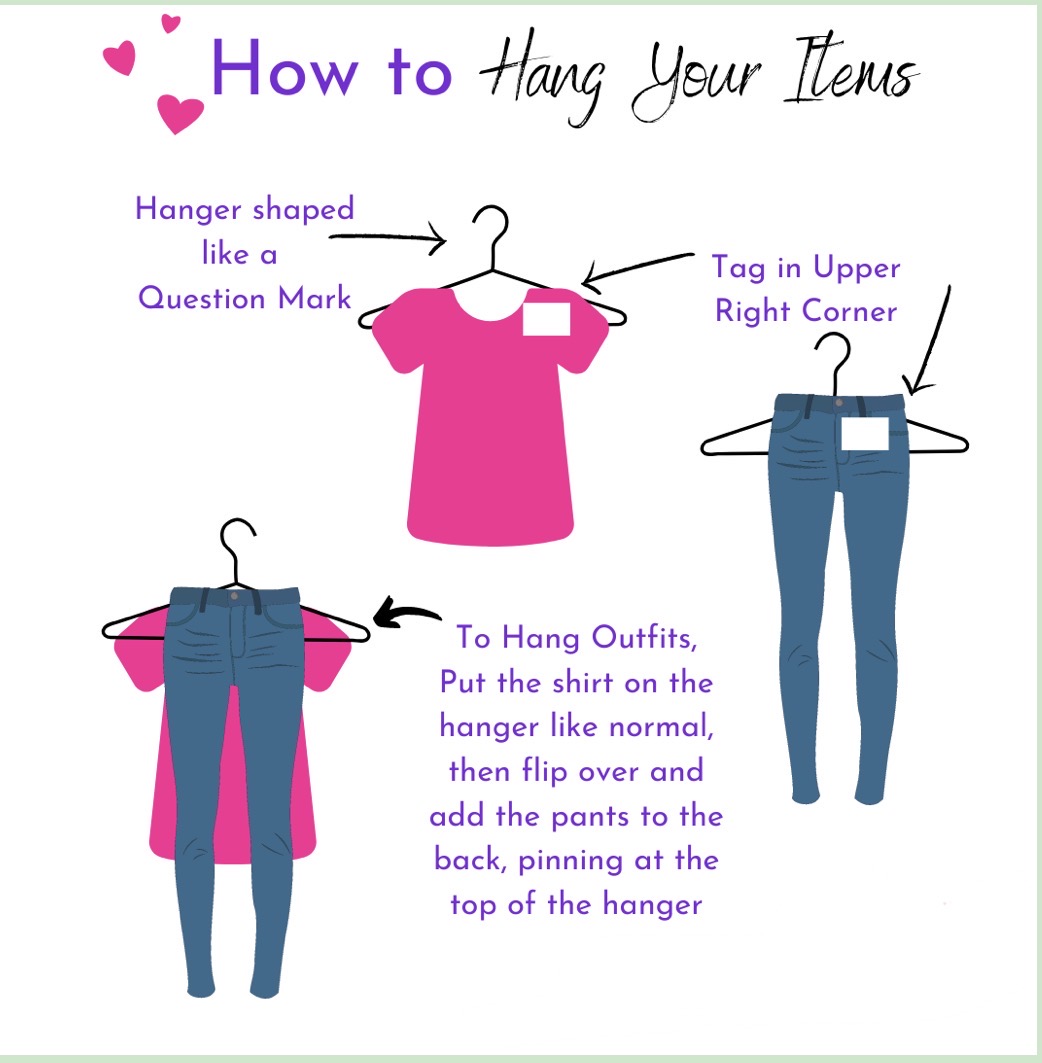
Hanger & Tag Placement
Hang clothing so the hanger hook points left (shaped like a question mark). Place the tag in the upper right corner of the item. For outfits, put the shirt on the hanger normally, flip it over, and pin the pants to the back at the top of the hanger. See the Visual Guides section below for illustrated examples.
Hanger Types: White Plastic or Wire Only
Please use only white plastic hangers or wire hangers. Clothespins and pant hangers are not allowed.
Important: No Handwritten Changes
Tags may NOT have handwritten changes to price, discount, or donate. If you make a mistake or change your mind, print a new tag. You will not be able to make changes once items are checked in, and handwritten changes will not be accepted at checkout.
Cut & Organize Your Tags
Cut your printed tags and keep them in order by item number. This makes it easy to find any specific item quickly during drop-off and throughout the sale.
Visual Guides
Reference these guides when hanging your items and pricing your clothing.
How to Hang Your Items
Ultimate Consignment Price Guide
Questions? We're here to help!
Contact Kelly at [email protected] or visit the main website.